This chapter introduces the following input methods for entering Korean characters:
In addition, it also describes:
You must activate a Korean input method for response to the requirements of applications that are internationalized for the Korean language. This section describes the steps you follow to activate a Korean input method.
Input methods are implemented by the DECW$IM input server. The DECW$IM input server is an X client process that runs on a standard X server. This means that the DECW$IM input server can run on any system that can access your X display device.
The DECW$IM input server provides input method services to the R6 X library (Xlib) supported by DECwindows Motif. You can write internationalized applications using the standard R6 application programming interface and communicate with the input server.
The DECW$IM input server is a multilingual input server because it gives you the means to use and manage input methods for Simplified Chinese, Traditional Chinese and Japanese, as well as Korean. This manual focuses on the Korean input methods.
The DECW$IM input server requires that you perform the following prerequisite steps:
There are several ways to start the DECW$IM input server:
If the Korean language is selected on the CDE login menu, the DECW$IM input server starts automatically by default. When you log in, the following command procedure runs:
CDE$SYSTEM_DEFAULTS:[CONFIG.XSESSION_D]0020IMS_START.COM
The value of the DTSTARTIMS symbol determines whether the command procedure will automatically start the input server.
If you want to start the DECW$IM input server by hand, enter the following command:
$ SPAWN/NOWAIT/INPUT=_NL: MC DECW$IM
If you want to start DECW$IM from a remote system, log in to the remote system and enter the following command:
$ SET DISPLAY/CREATE/NODE=<display-name>
$ SPAWN/NOWAIT/INPUT=_NL: MC DECW$IM
In the <display-name> field, enter the display name for your workstation.
After you activate an input method, applications that have been internationalized to support that input method can communicate with the input server to obtain input method services. You must start these applications after the input server starts.
Note
Applications that are started before the input server cannot connect to it. However, if the application contains an XmText or XmTextField widget with the reconnectable resource set to True, the application is able to establish a connection with the input server if the application starts before the input server or when the application is running and the input server stops and restarts. For more information, see XmText(3X) and XmTextField(3X).
The DECW$IM input server window provides an options menu, including the Class/Input Method Customization menu item. If you select Class/Input Method Customization, it displays the Customize Class dialog box. The Customize Class dialog box and its sub-dialog boxes are described in Section 6.5.
The title bar of the input server window is used to indicate the current state of the input server as described in Section 6.4.
By default, a client application starts in the English language input mode. If the DEW$IM input server is active on your system, use the [Ctrl/Space] key sequence to shift from English input mode to non-English input mode. When you use [Ctrl/Space] to shift to non-English mode, keyboard character input is transmitted to DEW$IM, which converts the input using a selected input method and transmits the converted input to the client application.
To select the Korean input method under DEW$IM, use the appropriate key sequence from Table 6-1. First, press the invocation key for the input method class ([Ctrl/Shift/F8] for Korean), and then an input method invocation key (any of [F5] through [F8]). Keep in mind that you do not repeat the invocation key for the input method class if you are switching input methods within that class. For example, use the [Shift/F6][F5] key sequence to invoke the Hangul input method under Korean, but to switch from Hangul to Phrase within Korean, use only [F8].
| Input Method Class | Input Method | Default Key Sequence |
|---|---|---|
| Korean | [Ctrl/Shift/F8] | |
| Hangul | [F5] | |
| Hanja | [F6] | |
| Row-Column | [F7] | |
| Phrase | [F8] |
The key sequences in this section can be customized by means of the Customize Input Method dialog box.
You can interact with the DECW$IM input server through a Motif-style user interface. This interface allows an input method to provide feedback about the data being edited to compose a character, list choices for selection, provide options for customizing the input server, and so on.
The X Input Method specification defines the three input areas shown in the following table:
| Area | Description |
|---|---|
| Auxiliary area | An option menu that helps you customize the input methods and the input method window. |
| Status area | Displays critical information about the internal state of the input methods. |
| Pre-edit area | Displays the intermediate text that is being composed. Also displays a list of valid candidates for the input key sequences. |
The use of the input areas depends on the interaction style (or pre-edit style) selected for the application. The Korean input server supports four interaction styles:
You can specify the priority of the interaction styles of DECwindows Motif applications by using the VendorShell resource, XmNpreeditType. By default, the resource value is set to:
"overthespot,offthespot,root,onthespot"
This list is in priority order. The first style in the list is used in an input method. If that style is not available, the second is used, and so on.
To set a preferred interaction style, you can do one of the following:
The XmNpreeditType resource is set to a priority list beginning with the pre-edit style that you have chosen. After that, the applications you invoke start up with the new setting.
Note
Some applications, such as DECterm, may provide their own user-interface to handle interaction styles. Those mechanisms may override the methods described here.
You can choose the Root Window interaction style if you want to display the pre-edit data in a separate window from the application window.
Figure 6-1. Root Window Interaction Style
If you want to display the pre-edit data in a fixed location of the application window, you can choose the Off-the-Spot interaction style. With this interaction style, the input server creates the input area at the bottom of the application window.
Figure 6-2. Off-the-Spot Interaction Style
If you want to focus your attention at the point of insertion during Korean data input, you can choose the On-the-Spot interaction style. In this style, the input server directs your applications to display the pre-edit data in a way which is consistent with the appearance of the existing data in the input field. For instance, an application can select the font size and typeface to display the pre-edit data and control how the data is highlighted. You can also format existing data to allow the pre-edit data to be displayed at the insertion point.
Figure 6-3. On-the-Spot Interaction Style
The Over-the-Spot interaction style allows you to perform Korean data input at the point of insertion. In this style, an input window is created when you invoke the Korean input mode; the window is placed over the current point of insertion. The pre-edit data entered is displayed in this window. The look and feel is similar to that of the On-the-Spot style, except that applications do not control the display attributes of the pre-edit data and no formatting is performed to accommodate the pre-edit. Therefore, there is less communication overhead between the input server and the applications. The performance of data entry through the Over-the-Spot interaction style is better.
Figure 6-4. Over-the-Spot Interaction Style
When you start the input server, no application is connected to it and the string "No Connection" is displayed in the title bar to indicate the state.
When an internationalized application is started in a Korean locale and gets focused, the string "영문 : " is displayed in the status area to indicate that the application is connected to the input server and the input mode is English. If you invoke a Korean input method, the input state displayed in the status area is updated accordingly. If you shift the input focus to a non-internationalized application window, the title of the input server window changes to "No Connection" again.
The input server can maintain multiple input states for each input context or application window. Thus, when you shift the input focus to an application window, the input server restores the previous input state for that application window. For example, if you are using an application window under the Hangul input method, then shift the input focus to another application window under the Row-Column input method, when you bring the previous window back in focus, the Hangul input method will be active.
The input server has different levels and different methods of customization. The input server window provides an options menu containing the following selections:
If you select Class/Input Method Customization, it displays the Customize Class dialog box. The Customize Class dialog box has further sub-dialog boxes. This series of dialog boxes enables you to do the following:
Changes you make to the DECW$IM input server settings are written to the DECW$IM.DAT file in your login directory.
Systemwide default settings for the DECW$IM input server are stored in the resource file, DECW$SYSTEM_DEFAULTS:DECW$IM.DAT, and in the configuration file, DECW$SYSCOMMON:[DECW$DEFAULTS.SYSTEM.XIM]DECW$IM_MODULES.CONF. The system administrator can modify these files to make systemwide changes.
If you select Class/Input Method Customization from the input server window's options menu, it displays the Customize Class dialog box. The Customize Class dialog box enables you to activate, deactivate, and customize the Korean input method class (as well as the other input method classes). The following table briefly describes each of the Customize Class dialog box selections. For a full description of the dialog box selections, see the input server online help.
| Selection | Description |
|---|---|
| Active Class | Displays the input method classes that are currently active on the system. Select one or more of these classes to customize or delete. |
| Invocation Key | Displays the key sequence used to invoke the selected input method class. Use the checkboxes under the display to change the invocation key. |
| Bell Volume Slider | A bell rings when an error is made during character composition. Drag the slider to adjust the volume of the bell. |
| Options pull-down menu | Select "Get System Defaults" to reset the Customize Class dialog box. |
| Add... | Opens a dialog box that allows you to select and activate a currently inactive input method class. |
| Delete | Deactivates a selected input method class. The class and its methods are made inactive and not available to applications. |
| Customize... | Opens a dialog box that allows you to activate, deactivate and customize the input method modules associated with a selected input method class. The Customize Input Method dialog box selections are similar to the Customize Class dialog box selections described in this table. |
| Set Default | Establishes the selected input method class as the default. |
| OK | Saves the customizations to become effective the next time you start the input server. Closes the dialog box. |
| Apply | Same as OK, except that the dialog box does not close. |
| Cancel | Closes the dialog box without making any changes. |
| Help | Displays help on this dialog box. |
If you click on the Customize button in the Customize Class dialog box, the Customize Input Method dialog box is displayed. The following table briefly describes each of the Customize Input Method dialog box selections. For a full description of the dialog box selections, see the input server online help.
| Selection | Description |
|---|---|
| Active IM | Displays the input method modules that are currently active on the system. Select one or more of these input methods to customize or delete. |
| Invocation Key | Displays the key sequence used to invoke the selected input method module. Use the checkboxes under the display to change the invocation key. |
| Options pull-down menu | Select "Get System Defauls"t to reset the Customize Input Method dialog box. |
| Add... | Opens a dialog box that allows you to select and activate a currently inactive input method module. |
| Delete | Deactivates a selected input method module. The method is made inactive and not available to applications. |
| Customize... | Opens a dialog box to change settings depending on the selected input method. |
| Set Default | Establishes the selected input method module as the default. |
| OK | Saves the customizations to become effective the next time you start the input server. Closes the dialog box. |
| Apply | Same as OK, except that the dialog box does not close. |
| Cancel | Closes the dialog box without making any changes. |
| Help | Displays help on this dialog box. |
Hangul characters are the most commonly used characters in Korea today. Each Hangul character represents one syllable. It is made up of a number of phonetic symbols called "Jamo". Altogether, there are 22 Jamo symbols for composing Hangul characters and they can be entered through the keys on the main keyboard, as illustrated in Chapter 5.
The input sequence of Jamo symbols should follow that of the pronounced syllables. The first Jamo input should always be a consonant. To enter a Hangul character, invoke the Hangul input method by pressing the respective key sequence and then enter the phonemes of the desired Hangul character.
For example, the string "한글" can be input using the Hangul method as follows:
| Hangul Character | Key Sequence | Composition |
|---|---|---|
| 한 | [G][K][S] | ㅎ, 하, 한 |
| 글 | [R][M][F] | ㄱ, 그, 글 |
To enter these characters, invoke the Hangul input method and then press [G] to enter the element "ㅎ" for "한".
$ ㅎ |
| 한글 : |
When you press [K] to enter the element "ㅏ", the element is composed with "ㅎ" to form "하".
$ 하 |
| 한글 : |
When you press [S] to enter the element "ㄴ", the element is composed with "하" to form "한".
$ 한 |
| 한글 : |
To enter "글", press the elements [R][M][F].
$ 하글 |
| 한글 : |
The word "Hanja" is equivalent to "Chinese Character". To enter Hanja characters, you should first enter the corresponding Hangul characters which represent their pronunciation and then convert them to Hanja characters.
To enter a Hanja character, invoke the Hangul input method and enter the Hangul character that represents its pronunciation. Before sending the character to the application, press the respective key sequence to invoke the Hanja input method. A list of Hanja characters corresponding to the pronunciation is displayed in the pre-edit area for selection. To select the desired character, press the numeric key associated with the character on the main keyboard.
For example, the string "韓國" can be input using the Hanja input method as follows:
| Hanja | Pronunciation | Key Sequence | Composition |
|---|---|---|---|
| 韓 | 한 | [G][K][S] | ㅎ, 하, 한 |
| 國 | 국 | [R][N][R] | ㄱ, 구, 국 |
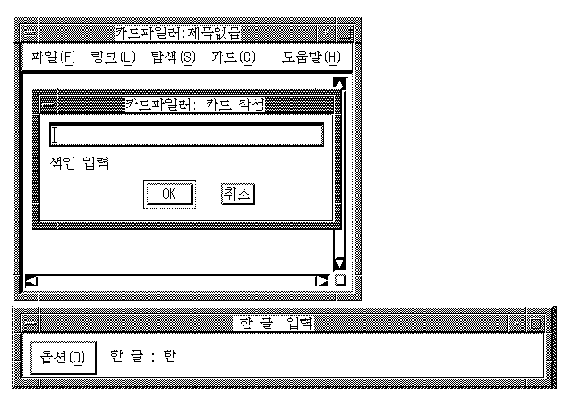
To enter the Hanja character "韓", invoke the Hangul input method and enter the corresponding Hangul character "한" by pressing [G][K][S].
$ 한 |
| 한글 : |
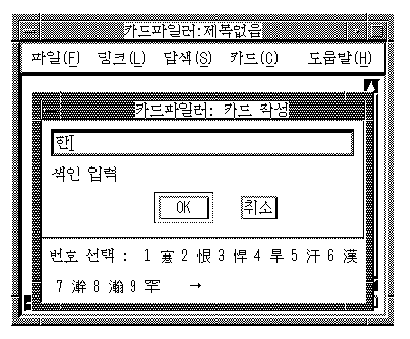
Then, invoke the Hanja mode.
$ 한 |
| 한자 : 1 寒 2 恨 3 悍 4 旱 5 汗 6 漢 7 澣 8 瀚 9 罕 -> |
The right arrow sign (->) indicates that more candidates are available for selection. To view the candidates on the next row, press [Space] or the right arrow key.
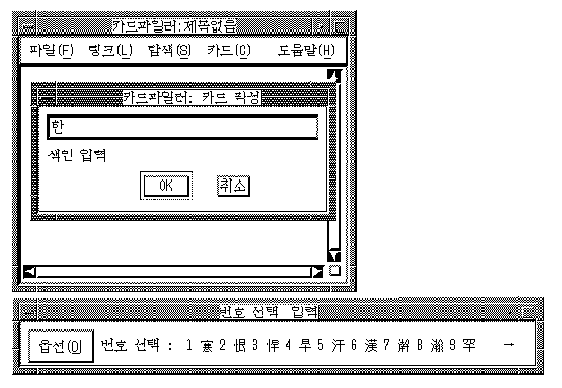
$ 한 |
| 한자 : 1 翰 2 閑 3 閒 4 限 5 韓 <- |
To move backward, press [Alt/Space] or the left arrow key.
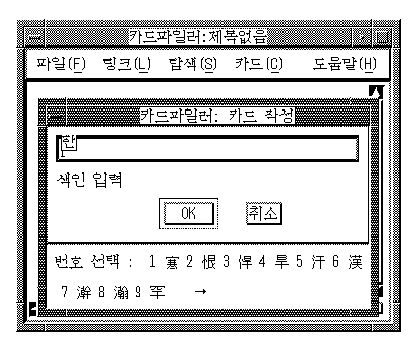
To select the character you want, press the numeric key associated with the character. In this example, while displaying the second group of candidates, press [5].
$ 韓 |
| 한글 : |
Similarly, you can press [R][N][R] to compose "국" and then invoke the Hanja input method to convert "국" to "國".
After you complete the input of a character, the Hanja input mode exits and returns to the previous input mode.
As described in Chapter 1, each character in the KS C 5601 character set is assigned a position in the character plane and can be uniquely identified by this position. You can enter Korean characters by specifying the row number and the column number of the desired character.
When the Row-Column mode is invoked, the string "행렬" is displayed in the status area. You can enter a row-column code through the keyboard and your keystrokes are echoed in the pre-edit area. Only the numeric keys are valid for the Row-Column input method.
$ |
| 행렬 : 3949_ |
The data can be in the following format where XX is the row number and YY is the column number:
| Types of format | Format | Example | Remark |
|---|---|---|---|
| 4-Digit | XXYY | 0263 | KS Code |
| 5-Digit | 0XXYY | 00263 | KS Code |
| 5-Digit | 1XXYY | 10263 | DEC Extension |
The Korean character is sent to the application after you enter a valid four-digit or five-digit code and press [Return] or [Enter].
For example, the row-column code of "한" is 3949. To enter this character using the Row-Column input method, invoke the input method, then press [3][9][4][9] and [Return].
$ 한 |
| 한글 : |
Alternatively, if you enter a two-digit row number and then press [Enter] or [Return], a list of characters assigned to that row is displayed. You can choose the character that you want from the list of candidates.
The Phrase input method allows you to define a database of frequently used phrases and store that database in a user or systemwide directory.
You associate each of the phrases in the phrase database with a unique phrase code. The phrase code can be any alphabetic label. The associated phrase can be any string of characters that is appropriate to the application's locale. You create the phrase database as a simple text file containing phrase codes and phrases and store it in a user directory or a system directory on a path that is locale dependent.
For example, if you create a phrase database file for use with applications running in the ko_KR.deckorean locale, you copy the file to one of the following directories:
Use the following rules when populating the phrase database:
To invoke the Phrase input method, you must use the DECW$IM input server to activate the input method and use the default key sequence (or an invocation key sequence that you have defined). For example, if the Phrase input method is active and the client application locale supports it, press the default invocation key, [F8], or a redefined invocation key to invoke the Phrase input method.
When you use the Phrase input method and enter a phrase code as input to the application, the input server searches your personal database file, if it exists, and the systemwide database file along the locale-dependent path. If the input server finds the same phrase code in both databases, it uses the definition in your personal database.
When you enter a phrase code, it appears in the pre-edit area. To correct erroneous input, use the [Delete] key and re-enter the code. Press the [Space] or [Return] key to signal the end of phrase code input.
If you enter an incorrect code, the error bell rings. The message, "Requested phrase does not exist", may also display. To correct the problem, make sure that the phrase is in the database file and that the file path and application locale are consistent.