![[Compaq]](../../images/compaq.gif)
![[Go to the documentation home page]](../../images/buttons/bn_site_home.gif)
![[How to order documentation]](../../images/buttons/bn_order_docs.gif)
![[Help on this site]](../../images/buttons/bn_site_help.gif)
![[How to contact us]](../../images/buttons/bn_comments.gif)
![[OpenVMS documentation]](../../images/ovmsdoc_sec_head.gif)
| Document revision date: 30 March 2001 | |
|
|
|
|
|
|
| Previous | Contents | Index |
When you perform the Change Process Priority fix, DECamds displays a dialog box similar to Figure 4-4.
Figure 4-4 FIX Process Priority Dialog Box
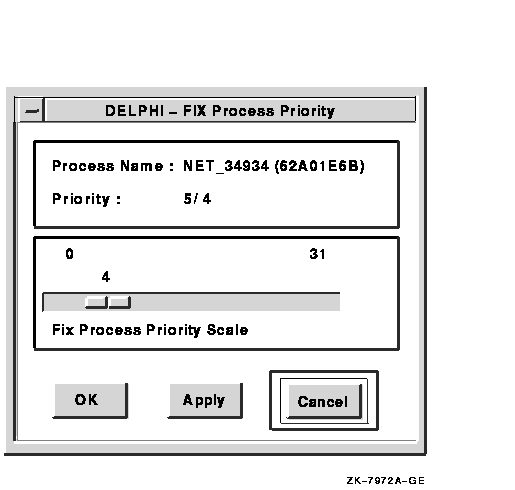
Setting a priority too high for a compute-bound process allows it to
consume all the CPU cycles on the node, which can affect performance
dramatically. On the other hand, setting a priority too low prevents
the process from getting enough CPU cycles to do its job, which can
also affect performance.
4.2.5 Crash Node Fix
When you perform the Crash Node fix, DECamds displays a dialog box similar to Figure 4-5.
Figure 4-5 FIX Crash Node Dialog Box
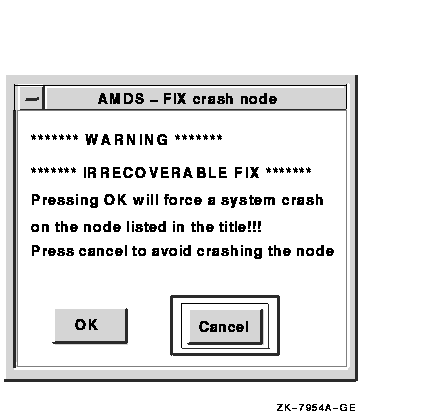
The crash node fix is an operator-requested bugcheck from the driver. It happens immediately when you click on OK in the Fix Crash Node dialog box. After performing this fix, the node cannot be restored to its previous state. After a crash, the node must be rebooted. |
Recognizing a System Failure Forced by DECamds
Because a user with suitable privileges can force a node to fail from the Data Analyzer by using the Crash Node fix, system managers have requested a method for recognizing these particular failure footprints so that they can distinguish them from other failures. These failures all have identical footprints: they are operator-induced system failures in kernel mode at IPL 8. The top of the kernel stack is similar to the following display:
       SP => Quadword system address
             Quadword data
             1BE0DEAD.00000000
             00000000.00000000
             Quadword data            TRAP$CRASH
             Quadword data            SYS$RMDRIVER + offset
|
When you perform either the Exit Image or Delete Process fix, DECamds displays a dialog box similar to Figure 4-6.
Figure 4-6 FIX Process State Dialog Box --- Exit Image or Delete Process
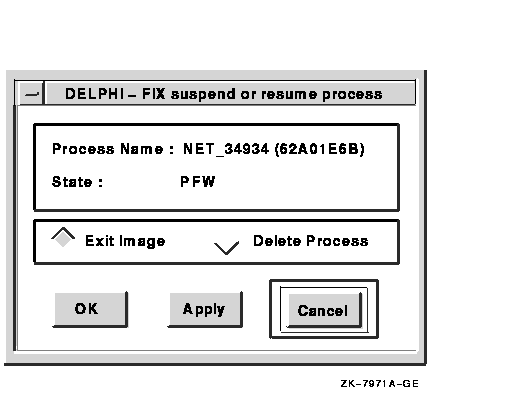
You cannot reverse the action when you delete a process that is in a resource wait state. You must reboot the node. Deleting a process on a node that is in a resource wait state might not have an effect on the process.
Exiting an image on a node can stop an application that is required by the user. Check the single process window first to determine which image it is running.
Deleting or exiting a system process could corrupt the kernel. |
When you perform the Purge Working Set fix, DECamds displays a dialog box similar to Figure 4-7.
Figure 4-7 FIX Purge Working Set Dialog Box
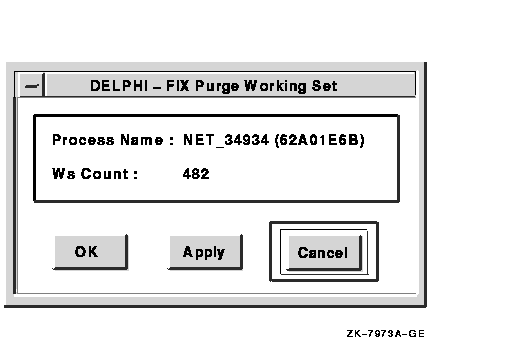
Continual purging of a working set on a node could force excessive page
faulting, which affects system performance.
4.2.8 Suspend Process and Resume Process Fixes
When you perform either the Suspend Process or Resume Process fix, DECamds displays a dialog box similar to the one shown in Figure 4-8.
Figure 4-8 FIX Process State Dialog Box --- Suspend or Resume Process
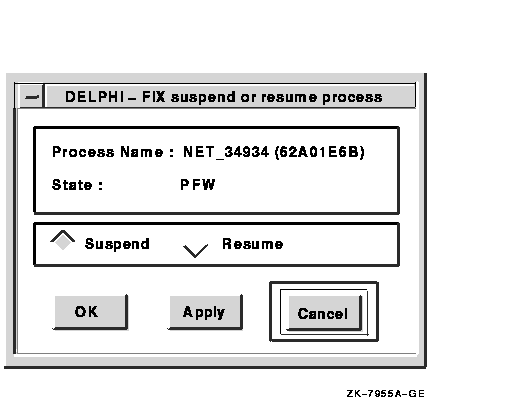
Suspending a process that is consuming excess CPU time can improve perceived CPU performance by freeing the CPU for use by other processes. Conversely, resuming a process that was using excess CPU time while running might reduce perceived CPU performance.
Do not suspend system processes, especially JOB_CONTROL. |
This section describes two approaches for solving a low memory problem, which is a common resource availability problem.
The procedure in Section 4.3.1 uses DECamds default settings. The
procedure in Section 4.3.2 shows how you can use DECamds to make a more
detailed analysis and investigation. Both examples begin at the Event
Log window entry.
4.3.1 Performing a Fix Using Automatic Fix Settings
When a process is page faulting, for example, it may signal a problem of available memory. A low memory (LOMEMY) event is generated. To fix this problem, you should purge the working sets of inactive processes. This will free up memory for the process that is page faulting. DECamds offers a quick, direct way to fix this and similar problems by performing the following steps:
DECamds lets you manually display additional information related to an event before performing a fix. The following example uses the same low memory problem described in the previous section to investigate and select specific fixes for the problem.
For this example, manually select the processes you want to fix from the Memory Summary window. You also may want to refer to data in the CPU Summary window.
To investigate the low memory event before fixing it, perform the following steps:
Figure 4-9 Sample Fix Dialog Box
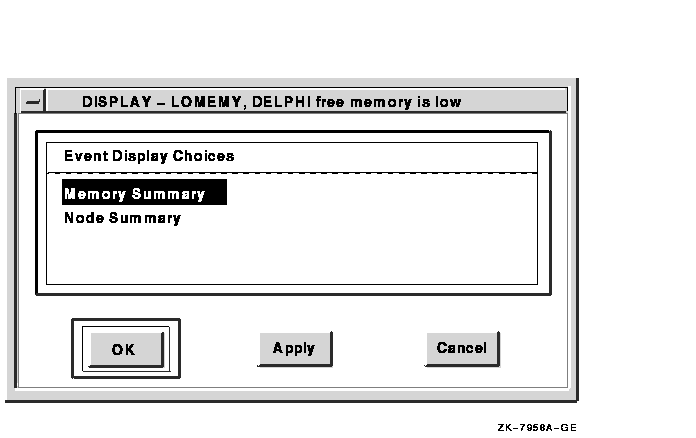
Figure 4-10 DECamds Memory Summary Window

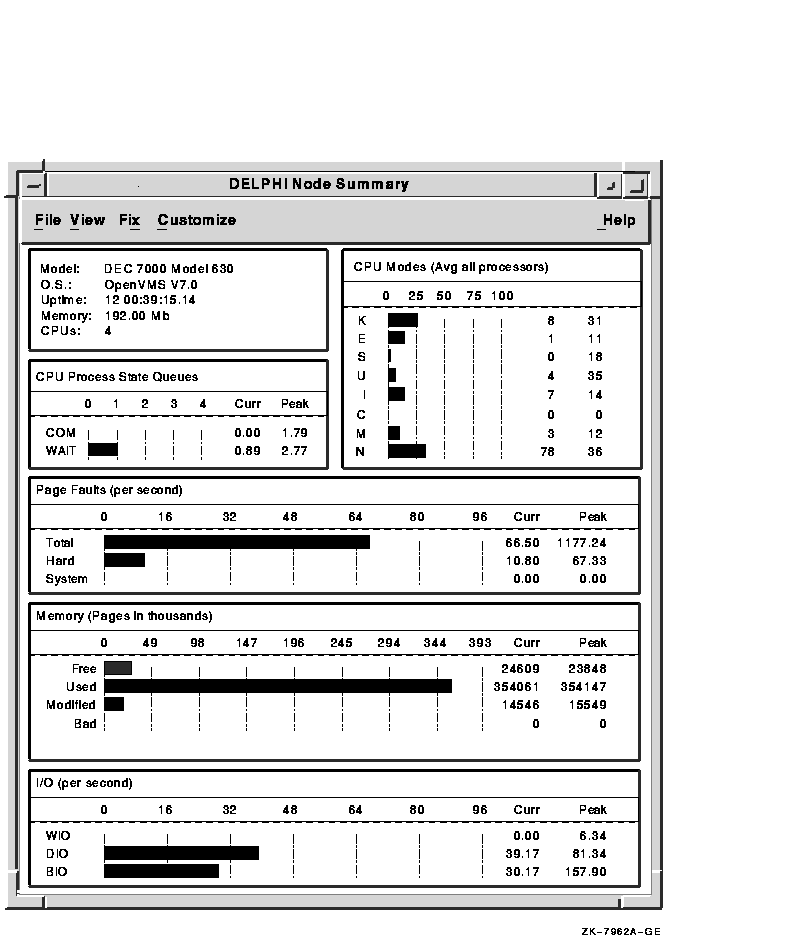
Figure 4-11 DECamds Node Summary Window
This chapter describes how to organize data collection, analysis, and
display by filtering, sorting, and customizing DECamds. It also
describes how some of these tasks can optimize the performance of
DECamds.
5.1 Customizing DECamds Defaults
To set DECamds application values such as bar graph colors and automatic collection options, choose DECamds Customizations from the Customize menu of the Event Log or System Overview window. DECamds displays the DECamds Application Customizations dialog box as shown in Figure 5-1.
Figure 5-1 DECamds Application Customizations Dialog Box
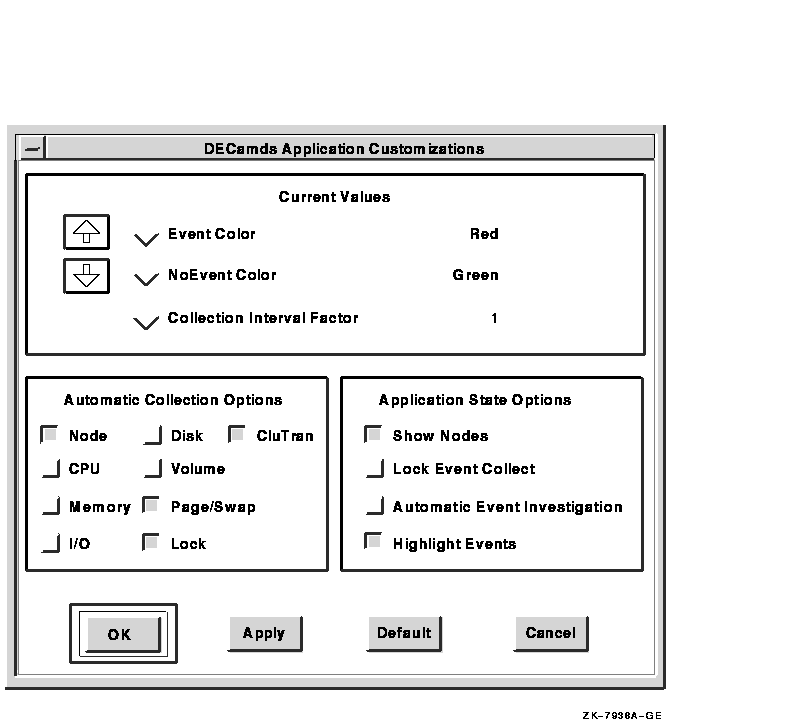
Table 5-1 lists the items you can customize.
To save your changes from one use to the next, choose Save DECamds Customizations from the Customize menu of the Event Log or System Overview window. The changes are stored in the AMDS$APPLIC_CUSTOMIZE.DAT file.
| Field | Default | Function |
|---|---|---|
| Current Values | ||
| Event Color | Red | Specifies the bar graph color used for signaled events. |
| NoEvent Color | Green | Specifies the bar graph color used for nonsignaled events. |
| Collection Interval Factor | 1 | This value is multiplied by a window's collection interval definition. Used to force windows to have longer time spans between data collection. Increasing this number decreases the use of the Data Analyzer's CPU and LAN. |
| Automatic Collection Options | ||
| Node | On | Determines whether node data is collected at startup. |
| CPU | Off | Determines whether CPU data is collected at startup. |
| Memory | Off | Determines whether memory data is collected at startup. |
| I/O | Off | Determines whether I/O data is collected at startup. |
| Disk | Off | Determines whether disk data is collected at startup. |
| Volume | Off | Determines whether volume data is collected on startup. |
| Page/Swap | On | Determines whether page and swap data is collected at startup. |
| Lock | On | Determines whether lock contention data is collected at startup. |
| CluTran | On | Determines whether a view of the cluster from the node on which Collect Cluster Transition Information was selected is collected. |
| Application State Options | ||
| Show Nodes | On | Determines whether the System Overview window starts up with individual node names displayed. |
| Lock Event Collect | Off | Determines whether DECamds automatically collects additional data about all the processes waiting for a locked resource. |
| Automatic Event Investigation | Off | Determines whether additional data is collected when DECamds detects an event. |
| Highlight Events | On | Determines whether event-related data is highlighted. |
By default, DECamds collects the following categories of data when started:
You can change the default amount of data collected when DECamds starts
by choosing DECamds Customizations from the Customize menu in the Event
Log or System Overview window. The DECamds Application Customizations
dialog box appears and you can click on the Automatic Collection
Options buttons to select or disable the categories you want. To save
the settings for the next time you run DECamds, choose Save DECamds
Customizations from the Customize menu.
5.1.2 Setting Automatic Event Investigation
Automatic Event Investigation enhances the speed with which you can pursue a specified event. When this option is enabled, DECamds automatically collects follow-up data on the event. When this option is disabled, you must initiate follow-up data collection when an event occurs.
To enable automatic event investigation, choose Enable Automatic Event Investigation from the Control menu of the System Overview or Event Log window. To disable it, choose Disable Automatic Event Investigation.
You also can set Automatic Event Investigation by choosing DECamds Customizations from the Customize menu; then click on the Automatic Event Investigation button in the resulting DECamds Application Customizations dialog box. To save the settings for the next time you run DECamds, choose Save DECamds Customizations from the Customize menu.
Note that enabling this option can significantly increase CPU, memory,
and LAN traffic load. By default, DECamds does not automatically
investigate events that might require attention. Automatic
investigation applies only to events that are detected after you enable
the option. It does not apply to lock-related events, which you can
control using the DECamds Application Customizations dialog box.
5.1.3 Setting Automatic Lock Investigation
With Automatic Lock Investigation, the Data Analyzer automatically investigates any signaled lock contention events. Setting this option allows you to determine more quickly the blocking lock in a resource contention situation.
Note that this option sometimes uses more DECamds memory, CPU, and LAN bandwidth to investigate locks that are very transient.
To enable automatic investigation of locks, click on the Lock Event
Collect button in the DECamds Application Customizations dialog box.
5.2 Filtering Data
DECamds can collect and display every event regardless of how important or unimportant an event is to you. However, you can narrow the focus so that the events that you want to see are displayed. You can use the following methods to determine which events qualify for your attention:
Figure 5-2 shows the process an event must pass through to qualify as important enough to be logged or displayed for your attention.
Figure 5-2 Event Qualification

To specify the events to be displayed in the Event Log window, perform the following steps:
| Filter | Description |
|---|---|
| Severity | Controls the severity level at which events are displayed in the Event Log menu. By default, all events are displayed. Increasing this value reduces the number of event messages in the Event Log window and can improve perceived response time. |
| Event Bell | Determines which events are marked by an audible signal by specifying a minimum event severity value. When a new event is displayed, if the severity value is the same or greater than the specified value, an audible notification is given. To disable the sound, specify a value of 101. |
| Bell Volume | Controls the pitch or sound level at which the bell is rung when an event is signaled whose priority is greater than the Event Bell filter. |
| Event Highlight | Determines which events are marked by a visual signal by specifying a minimum event severity value. When a new event is displayed, if the severity value is the same or greater than the specified value, an event is highlighted. To disable highlighting, specify a value of 101. |
| Event Signal | Determines the severity value at which DECamds signals an event for attention. Only events that qualify are passed on to be checked by any filters you may set for a specific event. Increasing this value reduces the number of event messages that need to be tested to see if further attention is warranted, which can improve perceived response time. |
| Event Timeout (secs) | Determines how long an informational event is displayed (in seconds). |
| Event Escalation Time (secs) | Determines how long an event must be signaled before it is sent to the operator communication manager (OPCOM). DECamds uses this value along with the Event Escalation Severity value. Both criteria must be met before the event is signaled to OPCOM. |
| Event Escalation Severity | Determines which events are sent to OPCOM. DECamds uses this value along with the Event Escalation Time (secs) value. Both criteria must be met before the event is signaled to OPCOM. |
You can also filter data in the following data windows:
The modifiable options that are displayed in the filter dialog box for the window vary with the window.
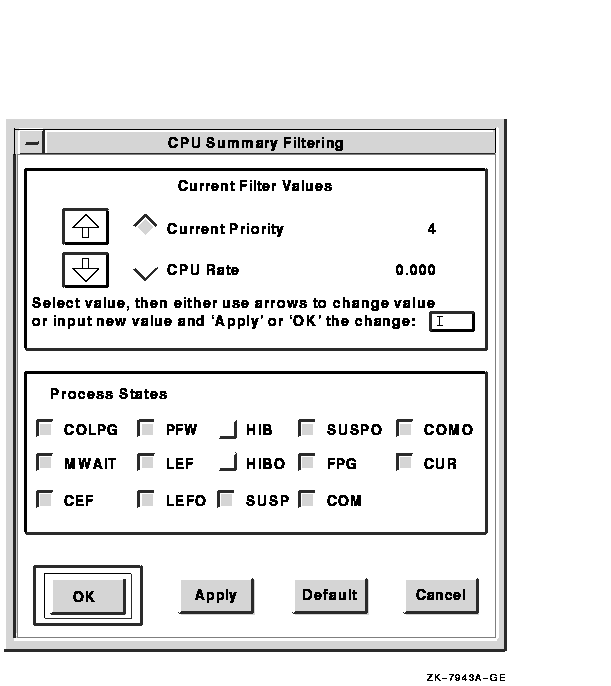
Figure 5-3 shows the CPU Summary Filtering dialog box. For a process to be displayed in the CPU Summary window, it must have a Current Priority of 4 or more and be in any of the process states indicated except HIB, HIBO, or SUSPO. No other processes are displayed.
Figure 5-3 CPU Summary Filtering Dialog Box
If the Enable Highlighting option is on, any process that signals an event is included in the display, regardless of whether it meets the filter criteria.
To change the value of a filter, turn the filter button on by clicking on it, and then click on the up or down arrow. Click on OK or Apply for the filter to take effect. To return to system default values, click on Default.
Some data windows also allow you to filter data by category. For example, in the CPU Summary window, you also can filter by the Process State category to display only processes in certain states. Category buttons that are selected display the associated information.
In the CPU Summary window, to display only inactive processes, select the HIB and HIBO buttons under Process States, and deselect all other process states. When you click on OK or Apply, only inactive processes appear in the CPU Summary window.
| Previous | Next | Contents | Index |
|
|
| privacy and legal statement | ||
| 5929PRO_006.HTML | ||