![[Compaq]](../../images/compaq.gif)
![[Go to the documentation home page]](../../images/buttons/bn_site_home.gif)
![[How to order documentation]](../../images/buttons/bn_order_docs.gif)
![[Help on this site]](../../images/buttons/bn_site_help.gif)
![[How to contact us]](../../images/buttons/bn_comments.gif)
![[OpenVMS documentation]](../../images/ovmsdoc_sec_head.gif)
| Document revision date: 30 March 2001 | |
|
|
|
|
|
|
| Previous | Contents | Index |
To generate a product report, follow these steps:
By default, the report is written to the current default directory, unless another directory is specified in the File Name dialog box.
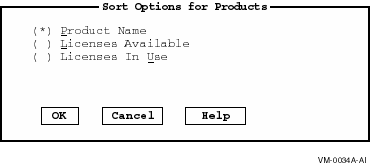
4.5.6 Sorting Product Displays
You can sort the display of the products in the List of License
Products screen. You can sort by:
By default, the list of products are displayed by product name. Perform the following steps to specify a different sort option:
Figure 4-8 Sort Options for Products Screen
You can use the License Manager to perform the following license group tasks:
When the file server software is initially installed, the Default group and the Server-Based group are created automatically. Any license products that are loaded onto the system are automatically placed in the Default group. To enable server-based licensing, you must allocate licenses from the Default group to the Server-Based group.
You can create user-defined license groups. These additional groups are for client-based licensing and are used to organize the distribution of licenses. The groups you create typically reflect the organizations that you support. For example, you may create the groups Engineering, Finance, and Marketing because these are the organizations you support. To utilize these groups, client software is configured so that a license is requested from that group.
To create a group, follow these steps:
Figure 4-9 Add New Group Screen
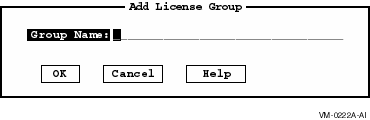
When you create a group, the license allocation is set to zero. You
must use the Modify Group function to allocate licenses to the new
group.
4.6.2 Listing Licenses in a Group
You can use the License Manager to determine how many licenses from each product have been assigned to each group. To list how many licenses have been assigned to a specific group, follow these steps:
Figure 4-10 Products Screen for Products in a Group
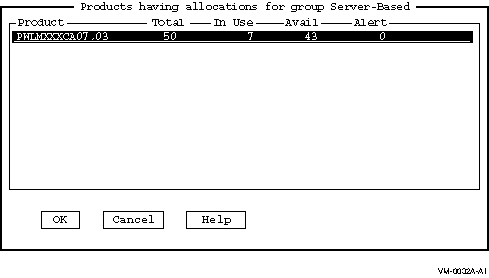
When you create a group, no licenses are automatically allocated to it. To allocate licenses to a group, you move them from the Default group to the group you want them in. You can allocate licenses at any time to any group except the Default group.
You cannot allocate licenses to the Default group. If you specify a product under the Default group, you can set only its alert level in this dialog box. |
To allocate licenses to a group, follow these steps:
Figure 4-11 Modify License Product Allocation Screen
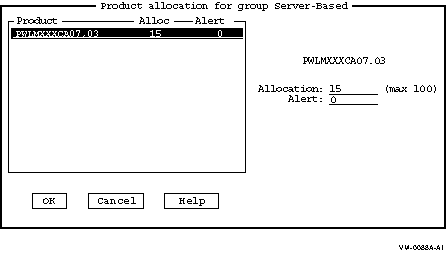
Table 4-4, Allocation and Alert Field Descriptions, describes the fields in the Modify License Product Allocation Screen.
| Field | Description |
|---|---|
| Product | The name of the product you chose. You cannot alter this field. |
| Max | The number of licenses in the Default group that are available for you to allocate to the group. If there are no available licenses for the product, the value of this field is 0. You cannot alter this field. |
| Alert | The number of licenses of this product allocated to this group that triggers a message warning you that the licenses used have reached this level. For example, if you have 100 product licenses allocated to the Services Group and have set the alert level to 90, when you have used the 90th license of this product in the Service Group, you receive a warning message. |
| Allocation |
The number of licenses you want to allocate to the group. If licenses
have been previously allocated, the value displayed for this field
tells you how many. If no licenses have been previously issued, the
value displayed is 0.
You can change this number to any number from 0 to the number indicated in the maximum field. If you decrease the number, the difference is returned to the Default group. If you increase the number, the increment is deducted from the Default group. To allocate licenses, add a number to the value displayed for this field that is equal to or less than the value of the maximum "Licenses available to issue" field. You cannot allocate more licenses to the group than are available from the Default group. |
If you have excess licenses in one group and not enough in another, you may want to change license allocations. To reallocate licenses, you decrease the number of allocated licenses from one group, which automatically assigns them to the Default group, and then you allocate the available licenses to another group.
To reallocate licenses to another group, follow these steps:
Removing a group deletes the group and causes the following actions:
Clients that request licenses from this group must be reconfigured to request licenses from a different group. For more information, refer to the appropriate client licensing software configuration help utility. |
To remove a group, follow these steps:
Any user-defined license group can be removed; the predefined Default group and the Server-Based license group cannot be removed. Removing a license group has the following consequences:
|
To set the alert levels, follow these steps:
You cannot set the alert level for the Server-Based group of licenses. |
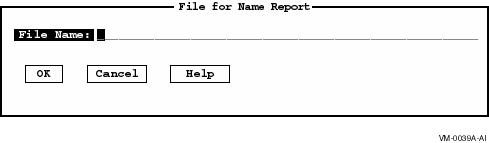
To generate group reports, follow these steps:
By default, the report is written to the current default directory,
unless another directory is specified in the File Name dialog box.
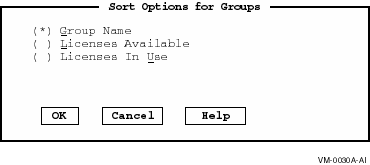
4.6.8 Sorting Group Displays
You can sort the display of the groups by:
To specify a sort option, follow these steps:
Figure 4-12 Sort Options for Groups Screen
Details about a client are available to the License Manager when the client is assigned a license or when an existing license is verified. If a client does not have a user name as configured by the PATHWORKS Client Configuration utility (PWSETUP), the client appears as <noname>.
You can perform the following client-related tasks:
When you revoke a client's license, you can reassign the license to another client or to the same client the next time the client requests a license from that group. When a client's license is revoked, the client must request a new one to access the file server again.
You may want to revoke a client's license for any of the following reasons:
To revoke a license assigned to a client, follow these steps:
Figure 4-13 List of Client Licenses Screen
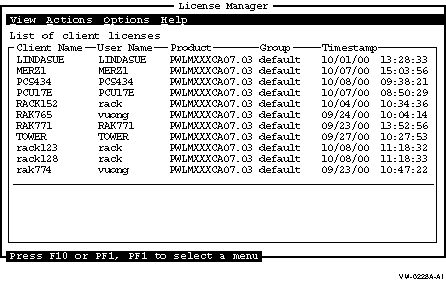
Figure 4-14 Confirm Revocation of Client License Screen

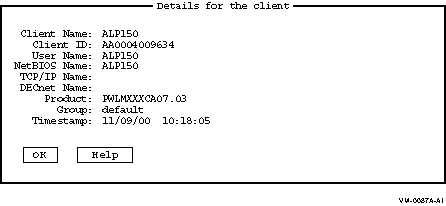
You can show the following detailed information about each client. These details are gathered when the client workstation requests a license from the License Server.
| Name | Meaning |
|---|---|
| Client Name | The name of the client. |
| Client ID | The unique client identifier (most often the address from a network adapter card in the client system). |
| User name | The user name configured with the PATHWORKS Client Configuration utility. |
| NetBIOS name | The machine name of the workstation. |
| TCP/IP host | The name of the TCP/IP client node. |
| DECnet node | The name of the DECnet client. |
| Product | The license product assigned to the client. |
| Group | The group name from which the license was assigned. |
| Timestamp | The date and time the license was issued. |
To show details for a client, follow these steps:
Figure 4-15 Client Details Screen
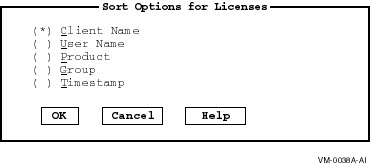
You can sort the order in which clients are displayed in the List of Client Licenses screen. To specify a sort order, follow these steps:
Figure 4-16 Sort Options for Licenses Screen
You can generate client license reports showing all client licenses that are currently in use, including the following information:
You can change the order of the client license information by using the Sort option as described in the Section 4.7.3, Sorting Client License Lists. To generate a client license report, follow these steps:
Figure 4-17 File Name for Report Dialog Box
This chapter briefly describes the licensing components that run on the client computer and how to obtain them. These components communicate with the licensing software components (License Registrar and License Server). (The licensing software components are described in Chapter 1, How to Use Advanced Server License Software.) This chapter also explains how to enable client computers to obtain licenses over a wide area network (WAN).
This chapter includes the following topics:
To obtain a client-based license from the License Server, the client computer must be running the software for license acquisition --- the client licensing software. This software enables the client computer to request and store license information for access to the file server.
If you plan to use server-based licensing only, the software components described in this chapter are not required. |
The client license components include:
The CLR works with the License Server to assign licenses to your client system. It also checks with the License Server at startup time to see if the license has been revoked by the network administrator. The CLT stores assigned licenses and presents them to the file server when asked.
For information on client licensing messages, such as the system error message you receive when you attempt to access the file server without a license, or the messages you receive when you run the Client Transponder or Client Requester software, see the appropriate client online help utilities.
Clients use the same transports to obtain and use their license keys as
they do to access their file services.
For clients connecting to the server using a dial-up connection, or
from a local area network (LAN) other than the server's LAN, extra
steps may be required to obtain a license. Procedures for dial-up
connections are described in the README.TXT file provided with the
Advanced Server PWLICENSE share on the file server. Procedures for
connections from a LAN other than the server's LAN are described in
Section 5.3, Enabling Wide Area Network (WAN) Operations.
5.2 How to Obtain the Client Licensing Software
You can obtain client licensing software from the following sources:
Windows 2000 clients can obtain client license software from the PATHWORKS 32 distribution kit. Or, you can ensure that server-based licensing is enabled so that clients can map to the PWLICENSE share and install the client licensing software from there. |
To connect to the PWLICENSE share from a client that has not yet obtained a client-based license, a server-based license must be available to assign to the client. If necessary, use the License Manager to allocate a license to the Server-Based license group. |
For information about installing the client licensing software, refer to the README.TXT file provided in the Advanced Server PWLICENSE share provided on the file server.
| Previous | Next | Contents | Index |
|
|
| privacy and legal statement | ||
| 6554PRO_005.HTML | ||